Adventures in pasta making
Story by Logan Crumpton and Philip Pietri • Photography by Philip & Jessica Pietri
 It’s an intriguing proposition: to master a skill that many consider an art form.
Pasta is one of the most universal foods there is; it’s extraordinary how reasonable and harmonious a perfectly executed bowl of pasta can be. Excited by the challenge and eager to rise to it, we — two home cooks — set out to teach ourselves, in tandem, how to make pasta from scratch. Our determination to get it right on the first attempt seemed on the surface to be a recipe for imminent disaster. We were, nonetheless, up for the task.
Sadly, neither of us had even once attempted melding the meekest assortment of ingredients into an intertwined symphony of al dente goodness. Not to say eating the stuff was foreign to us, as we both grew up devouring mounds of pasta on a regular basis. Also, we both have sampled many restaurant offerings to give us clear insight into the matter. We have an innate need to try new things and experiment in the kitchen in order to become more well-rounded cooks. We look to fill our lives with knowledge and understanding of new cuisines and cultures. If we can’t gain this knowledge through some adventurous globetrotting, then we strive to bring those concepts and philosophies into our own kitchens here at home. Therefore, an agreement was swiftly made. We must make our own pasta and catalog the entire experience.
Without question, handmade pasta will always be far better than the boxed, dried, store-bought variety. Yet, I can only think of a few friends that have even attempted the task.
Even restaurants often reach for the boxed version and don’t dare embark on the pasta-making journey. If handmade is better, then why doesn’t anyone actually make it? It’s an obvious deduction that most have the custom of gravitating toward the simple stuff. Store bought is very cheap. Even the most expensive variant of dried pasta won’t set you back more than a couple of bucks. Secondly, dried pasta is nearly impossible to mess up. Throw a box in a big stockpot of boiling water with a pinch of salt. After about five minutes, pull out a noodle and throw it against the wall. If it sticks, it’s done (at least that’s how my mom showed me how to test for doneness). Making a store-bought pasta dish takes little time or effort. From box to table, the total interval spent composing a meal could equate to less than 15 minutes depending on your sauce — a very desirable turn-around time indeed.
Our experiment included two different recipes on which we worked together. When deciding what kind of pasta Philip would attempt, he immediately knew his course of action: a traditional Italian approach of hand-cut ravioli stuffed with roasted mushrooms. This was a wise choice, as his dough would prove to be a very versatile canvas. I took a different approach. In considering our community’s strengths and weaknesses, and thinking about what our local menus lack, I landed on ramen. I’ve yet to find a decent bowl of ramen anywhere in Lakeland.
From East to West, the pasta-making process begins the same way around the world: a mound of flour made into a well, a few eggs, and sometimes a touch of oil. Many well-versed chefs believe that hand-made pasta is the best barometer by which to gauge the difference between good and great cooks. The following is our pasta-making journey from flour to bowl, blunders and all.
 I’d heard making ramen was tough. And, tough turned out to be accurate. In preparation, I researched the many different techniques that both professional and home cooks have used to mimic true ramen noodles. Some recipes call for eggs while others omit them completely. I learned that the ingredients necessary to make authentic ramen noodles are basic: flour, water, salt, and sodium carbonate (or kansui in Japanese). No matter where my searches led, I could not seem to find sodium carbonate locally. Maybe I wasn’t looking in the right place, as I’ve since read it can be found in most pharmacies. I found an article online from the well-respected food scientist Harold McGee speaking to the point that baking soda can have its scientific properties reversed and turned into sodium carbonate by baking at 250 degrees for one hour. Oh boy.
There’s a reason why ramen cooks spend a career’s worth of time honing their technique.
Making the noodles is just as precise as the proficient art of sushi-making, and our experiment unequivocally proved it. Continuing on with the experiment, I asked a handful of chefs that run their own operation about the process. None had even attempted the feat once, which solidified the point that our undertaking was both brash and nonsensical. The curse of the home cook is that sometimes recipes simply don’t work according to plan. Whatever the case may be, whether it’s latitude, longitude, climate, the quirkiness of the oven, or the entirely possible occurrence of a mistyped measurement ending up in print, there are many variables that cause misadventure. Sometimes, though, you can do everything right and still the results are lackluster. It takes discipline, patience, and the ability to adapt in order to get things done. It also may require a backup plan.
I messed up on the noodles.
I followed the instructions implicitly, baking my baking soda at exactly 250 degrees for exactly one hour. I absorbed it with exactly a half cup of warm water and a half cup of room-temperature water before mixing with exactly three cups of all-purpose flour. The dough was as dry as a barren, post-apocalyptic wasteland. Yet, I did not add additional water since the instructions told me I would be tempted, but do not add more water! I kneaded it exactly five minutes before letting it rest at room temperature in plastic wrap for exactly 20 minutes. At first I was ashamed, because my dough turned out to be as firm and as impermeable as Mt. Rushmore. Quickly, I went through the five stages of grief before remembering that I had a backup: two lovely packets of organic dried rice and bamboo ramen from my local health-food store. This savior allowed me to keep going against all odds in order than I might follow through in providing a luscious and complete bowl of ramen noodle soup.
I wanted the star to be my hand-pulled noodles, however it proved to be the influence of a subtly nuanced dashi-based broth that took center stage. Even with all the failures, I still have no intention of giving up on my quest to make homemade ramen noodles. In, the meantime, enjoy all of the components of a great bowl of ramen using dry, store-bought noodles in this highly adaptable and interchangeable recipe.
[accordion]
[item title=”KATSUO DASHI RAMEN WITH PAN-ROASTED PORK LOIN“]
 Start by marinating the pork.
You’ll need:
1-1/2 pounds pork tenderloin (remove any silver skin, if needed)
1/3 cup tamari or soy sauce
1/3 cup sugar
2 Tbsp. of sake or dry white wine (plus extra 1/4 cup for cooking)
2 Tbsp. of rice wine vinegar
In a large, resealable container combine the tamari, sugar, sake, and vinegar until incorporated. Add the pork and coat completely. Seal and let rest in the refrigerator for at least 1 hour.
DASHI BROTH
2 quarts chicken broth
2 strips of kombu (dried kelp)
1/3 oz. katsuobushi (dried bonito flakes)
6 garlic cloves, smashed
2-inch piece of whole, raw ginger, sliced into thick slivers
1/4 cup tamari or soy sauce
2 Tbsp. sake
1 Tbsp. rice wine vinegar
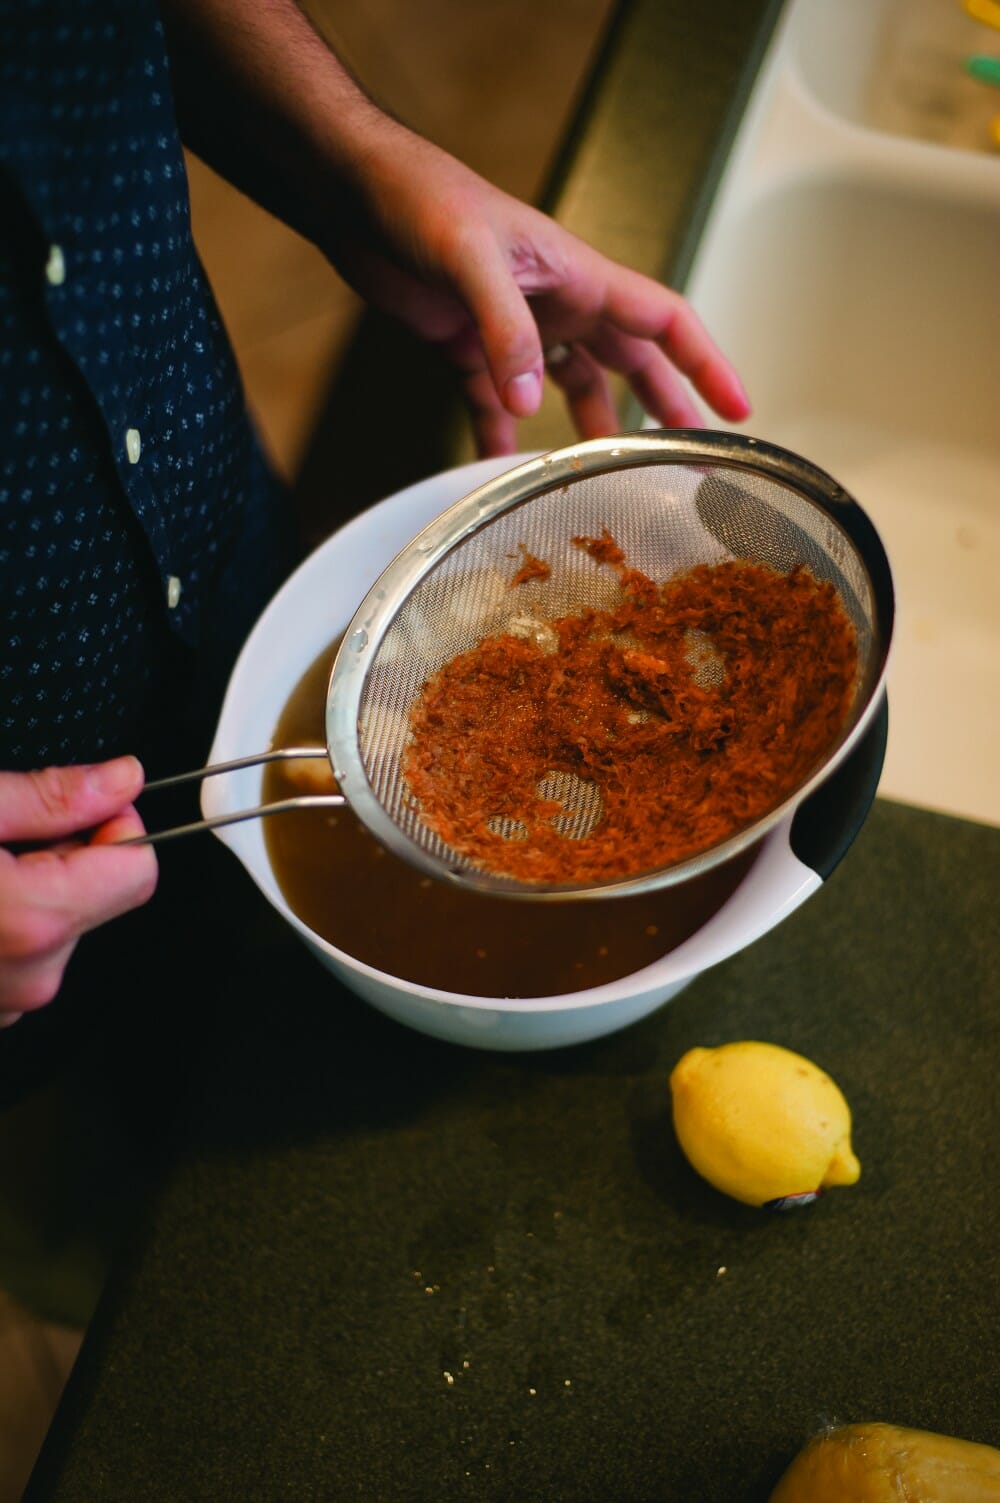
In a large stock pot, add broth, kombu, bonito flakes, garlic, and ginger. Bring to medium simmer*. After 30 minutes, use a fine mesh strainer to remove the kombu and skim out the bonito flakes. It won’t take long to impart the entire flavor you will want out of them. Add the tamari, sake, and vinegar. Lower heat and simmer for at least an additional 30 minutes.
*If you want to add smoky pork essence, place a ham hock into the broth at the onset, then remove before serving.
 PAN-ROASTED PORK
Remove the tenderloin from the marinade, and wipe off any excessive liquids. In a large pan, heat 1 Tbsp. grapeseed oil on medium-high until you see whiffs of smoke appear. Place tenderloin in pan and let sit for 1-1/2 minutes before turning. Make sure to wait the whole amount before each turn. All sides should be a deep-brown caramel color. Then, deglaze the pan with 1/4 cup of sake and 1/2 cup of water. Cover and lower heat to medium. Cook an additional 8-10 minutes. Remove from pan and let rest 10 minutes before slicing. The center should show a very faint hue of pink.
 COOKING THE NOODLES
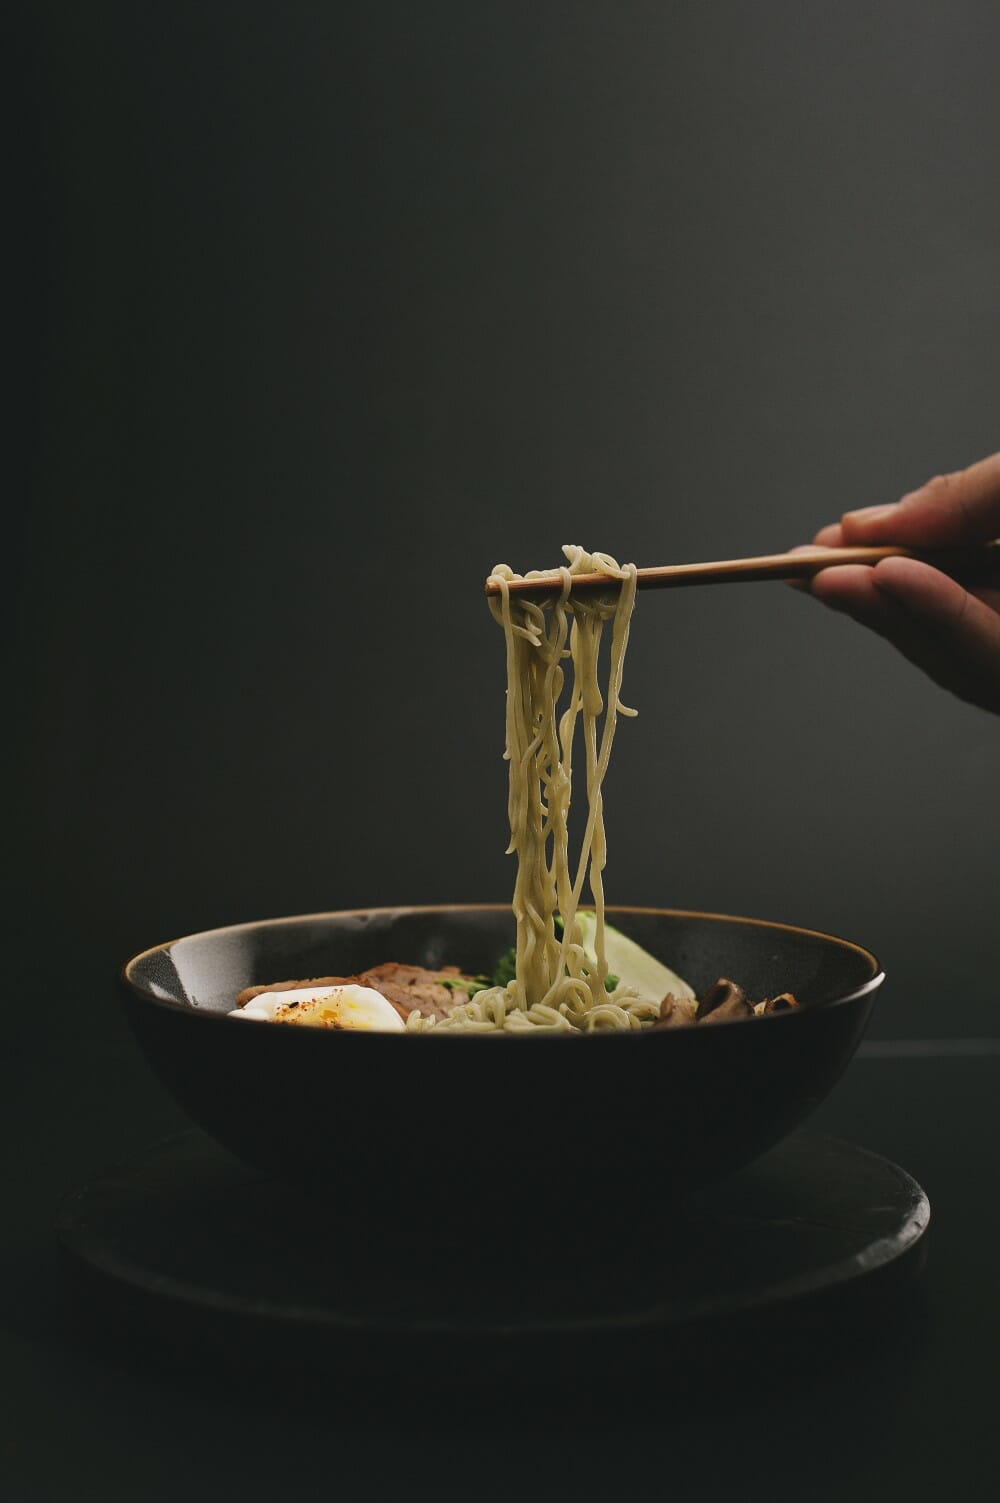
Since we are using prepacked noodles, this is the easiest step. You can use any kind you like. I prefer a brand that can be found in the local health-food store, made of dried riced and bamboo. However, even the 17-cents-a-pack variety will suffice. Just do not add the flavor pouch into the water. Follow the instructions on the back of the wrapper, which will probably tell you to drop noodles in a pot of boiling water for four minutes, stirring constantly. Strain and serve.
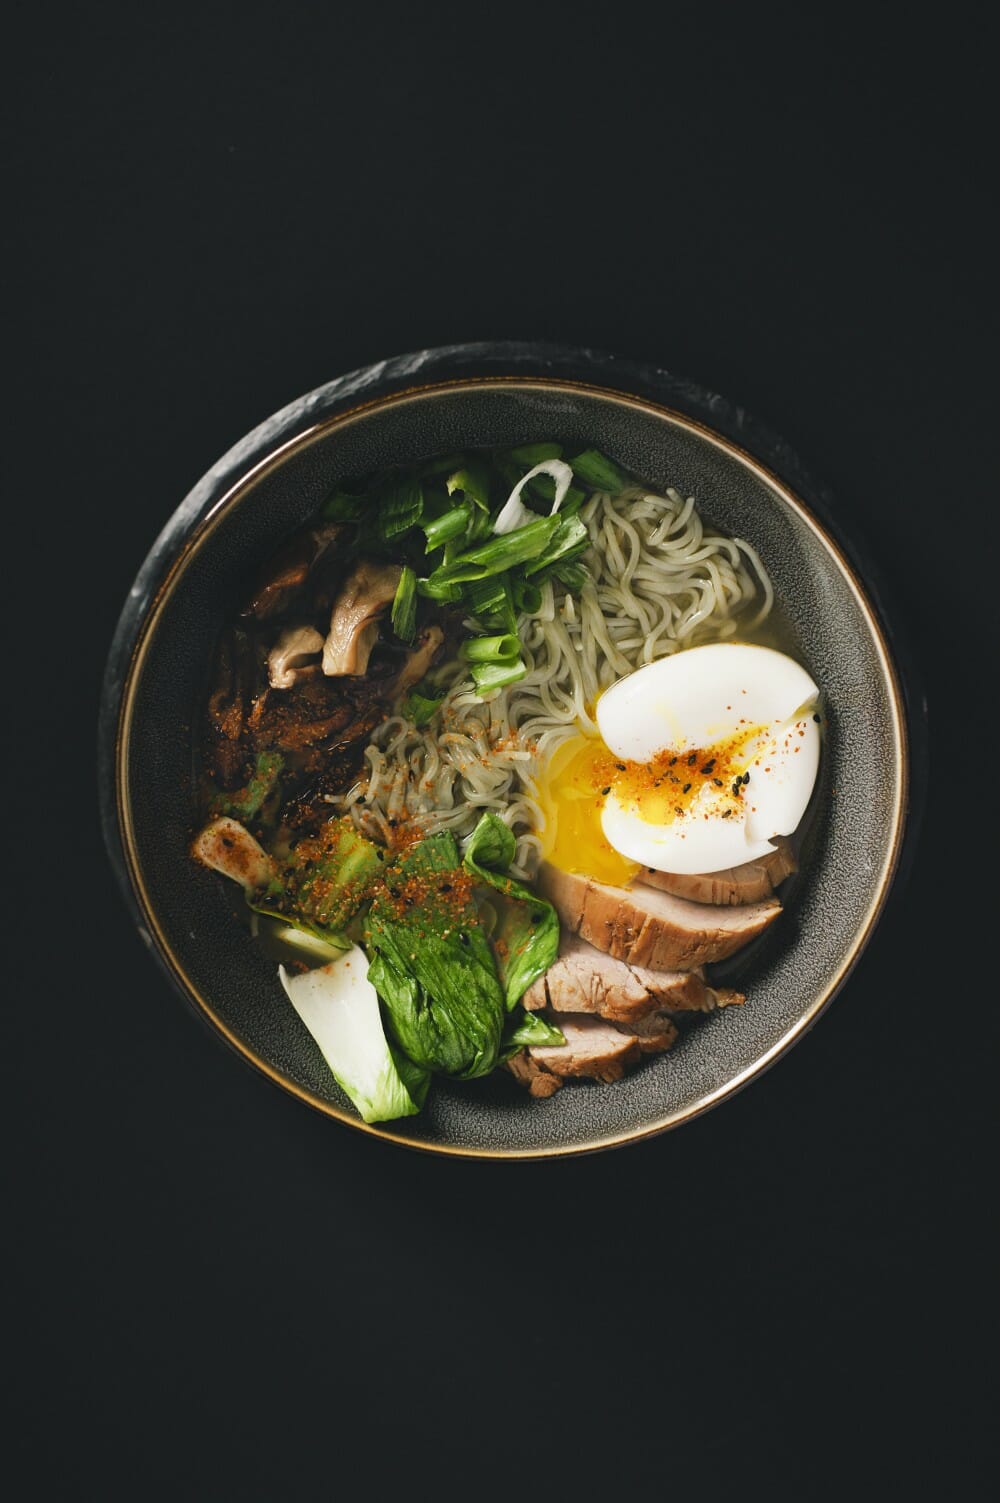
Additional accoutrements for your bowl:
Green onion – 4 stalks, chopped on a bias
1 bottle of togarashi – for a spicy jolt
Butteryaki mushrooms – In a large pan, heat 3 Tbsp. of unsalted butter on medium-high. Sauté one pint each of sliced shitake and maitake mushrooms for 7-8 minutes. Lower heat, and then add 1 Tbsp. soy sauce.
Blanched baby bok choy – Separate leaves from core of six small heads of bok choy and place in dashi broth for 5 minutes. Remove from broth and set aside.
Soft egg – Fill a pot 2/3 full with water and bring to a rolling boil. Remove from heat and then immediately add eggs that have been sitting at room temperature. Let sit for 4-1/2 to 5 minutes; then place in an ice-cold water bath. Remove shell once cool enough to handle.
HOW TO PLATE RAMEN
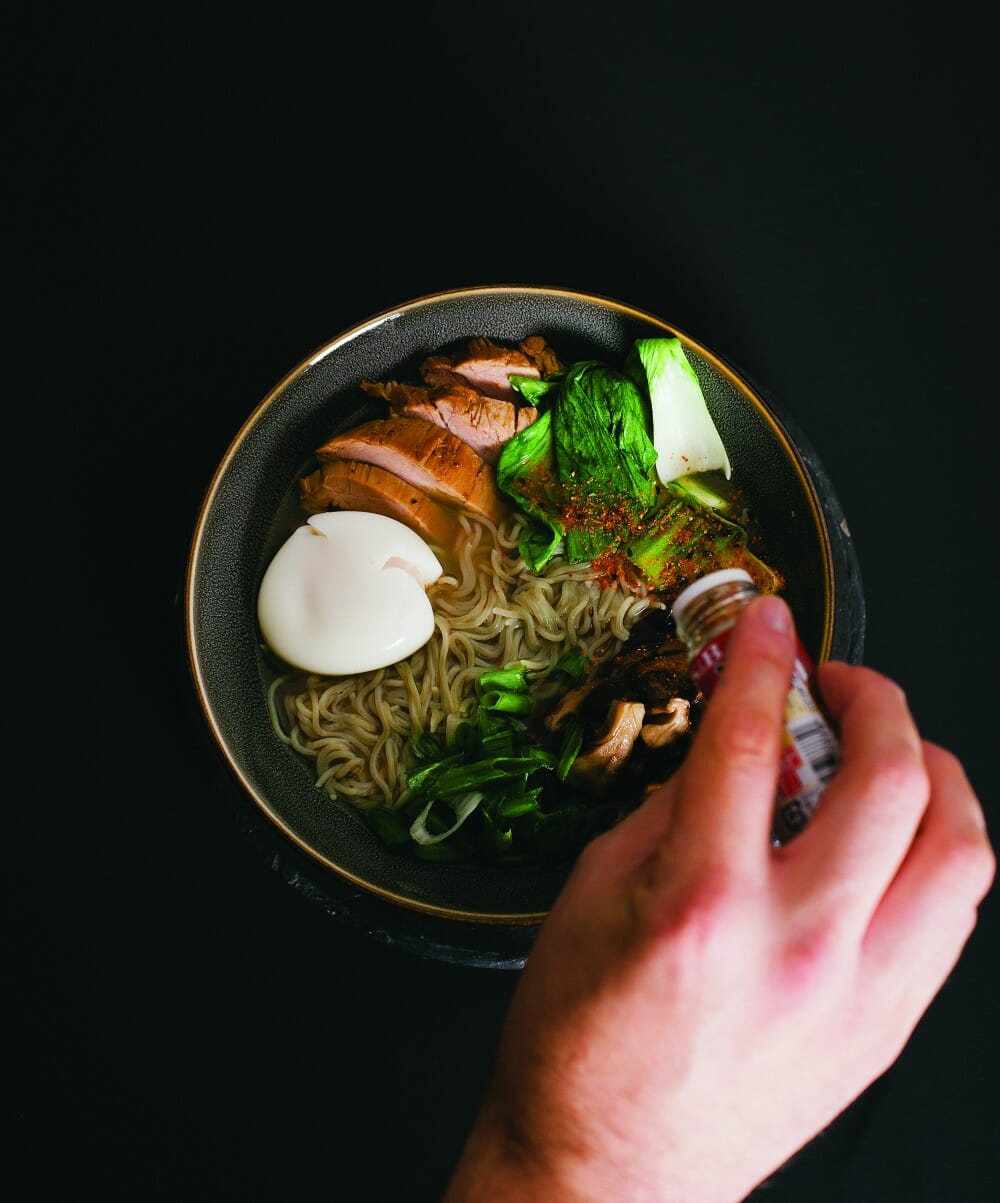 Noodles first, broth last: that way you can place everything precisely how you want it without risking overflow. Once the noodles are in the bowl, arrange the accompaniments in their own corners, so you can disperse them as you see fit. If you care about aesthetics, try to keep similar colors separate; it will make for a prettier bowl. Serving the broth from a kettle makes for a more precise pour and keeps the broth hot and handy when sitting at the table. Most importantly, once the meal begins, don’t forget to slurp. It’s the best way of telling the cook you like the food.
All of these ingredients can be found in town; most can be found at any large grocery store. Items such as katsuobushi, kombu, tamari, maitake, and togarashi can be procured in all the Asian markets within the city.
[/item][/accordion]
…don’t forget to slurp. It’s the best way of telling the cook you like the food.
 My last name is Pietri. My wife’s maiden name is Piccarelli. You might assume that a household with two people who have carried an Italian last name their whole lives would see pasta peaceably finding its way into the weekly dinner cycle without any question or contention. Not so. She has always loved it. I had always bitterly contested it. I defined pasta as the crap you get in a box that you boil up when you don’t have time to prepare a REAL meal. But that all changed when I started eating at establishments that made their pasta in-house. I grew to appreciate it for what it was, which was a far departure from that boxed stuff. But even though I was coming around, I held this belief that I simply did not have the competence to make pasta on my own.
I remember seeing a television show a few years ago that had a brief feature on the art of making pasta. There was this expressionless elderly woman hunched over a table in a cavernous, undecorated kitchen laboriously kneading pasta dough. It was dark, save for a dramatic beam of light spilling from a single window that lit the whirling cloud of flour dancing around her as she worked. It really romanticized the idea of making pasta for me. I told my wife, “One day I’m going to attempt fresh, home-made pasta.” Again, that was years ago. I never did it.
Collaborating with Logan made the thought of trying my hand at home-made pasta less daunting. And even though I had to navigate some expected screw-ups, we made it happen. The fuss over pasta night between me and my wife might soon be a thing of the past…
[accordion]
[item title=”WILD MUSHROOM RAVIOLI WITH ASPARAGUS VELOUTÉ“]
Start by making the dough.
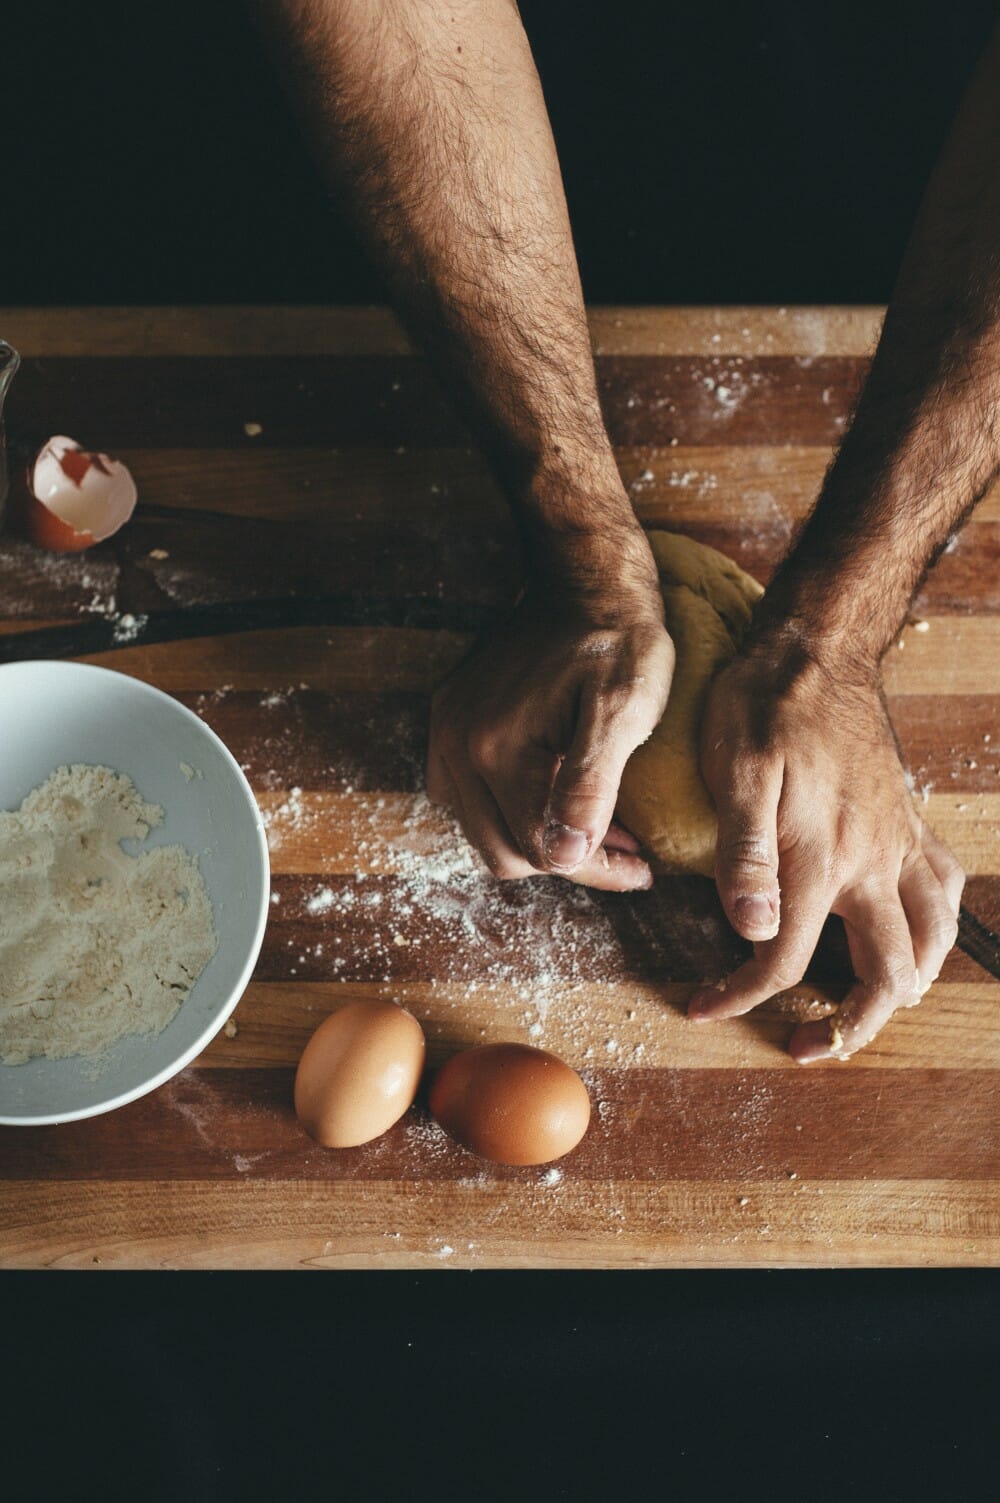 2 cups flour (have some extra off to the side for dusting)
1/4 cup water
2 Tbsp. olive oil
2 eggs
Pour flour into a large bowl. Using your fingers, create a well in the middle of the flour large enough to hold the eggs. Break the eggs into a separate bowl and add olive oil. Pour the eggs and oil into the well. Using a fork, whisk the eggs in the well. When you see that the eggs are fairly well mixed, start working the flour into the egg mixture with your fork. It will combine into a messy dough. Using your hands, bring the dough together into a ball. If it’s too sticky, sprinkle some of the extra flour onto the dough. Transfer the dough onto a floured surface and knead vigorously for 8 to 10 minutes. The final product should be somewhat elastic and smooth. Put in plastic wrap (or under a large bowl) and let rest for
30 minutes.
In the meantime, make the mushroom filling.
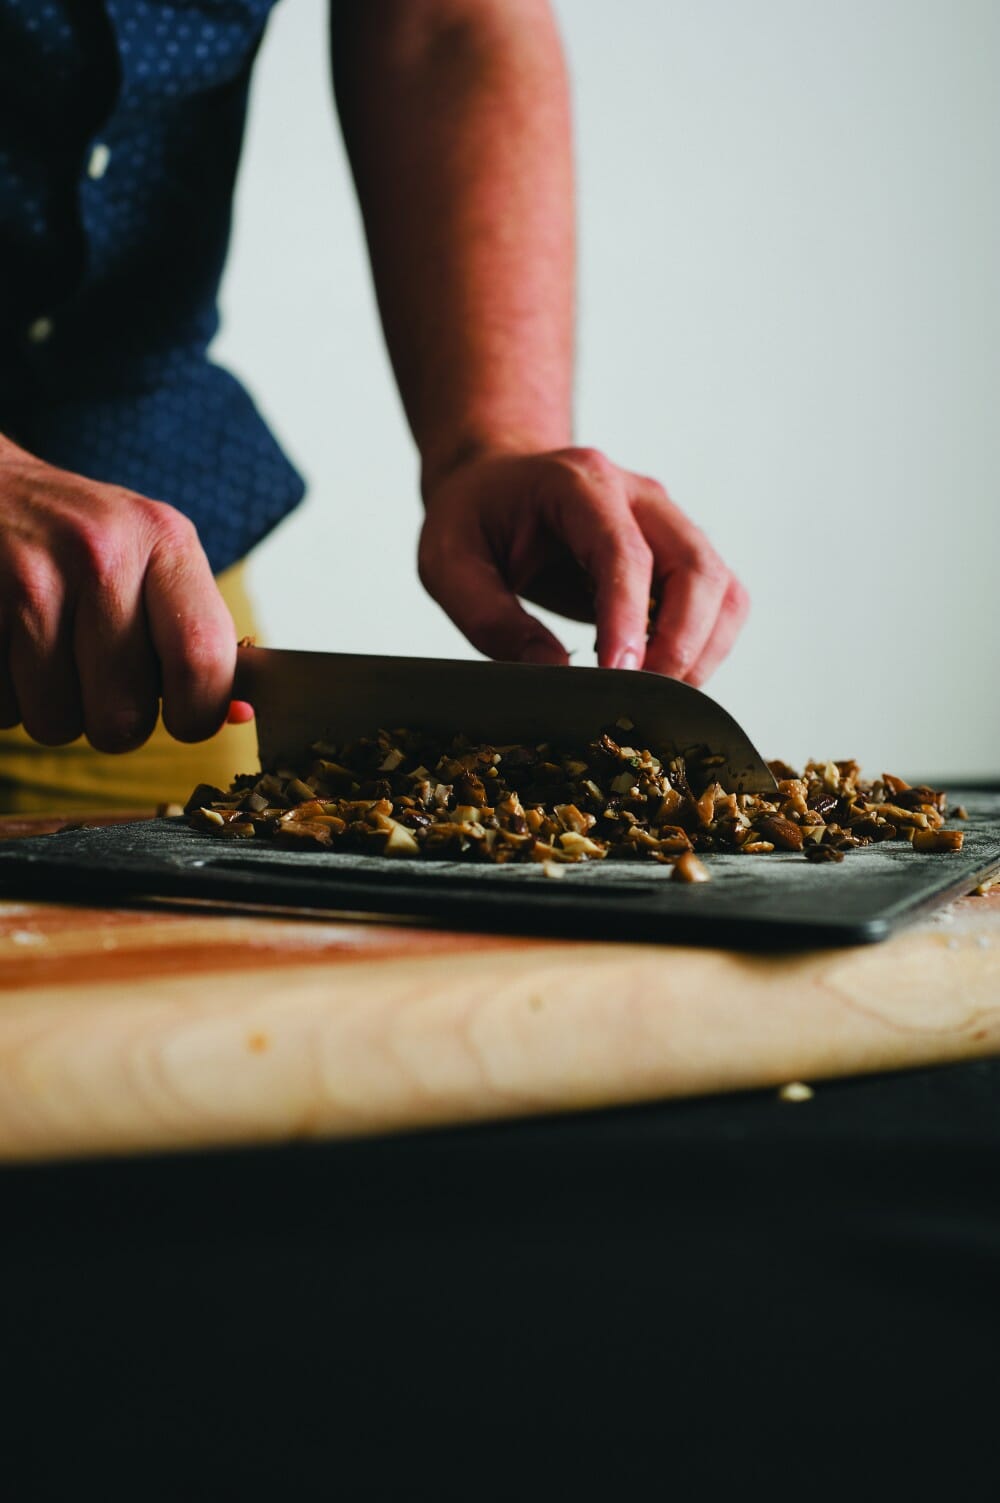 MUSHROOM DUXELLE
2 pints sliced crimini mushrooms
3 Tbsp. unsalted butter
1 tsp. salt
1 sprig each rosemary and sage (whole)
2 bay leaves (whole)
3 garlic cloves (minced)
Heat a large skillet to medium-high. Place butter in the pan and let melt completely. Add mushrooms and season with salt. It’s very important not to move them around for the first few minutes so they can develop texture and color. After they’ve cooked 3-4 minutes, add rosemary, sage, bay leaves, and garlic. Sauté until mushrooms are completely cooked through and deep golden brown. Finish by adding a seasoning of salt to taste. Remove from heat, and discard the whole pieces of herbs. Allow to cool, then chop until the mushrooms are finely minced.
Set aside.
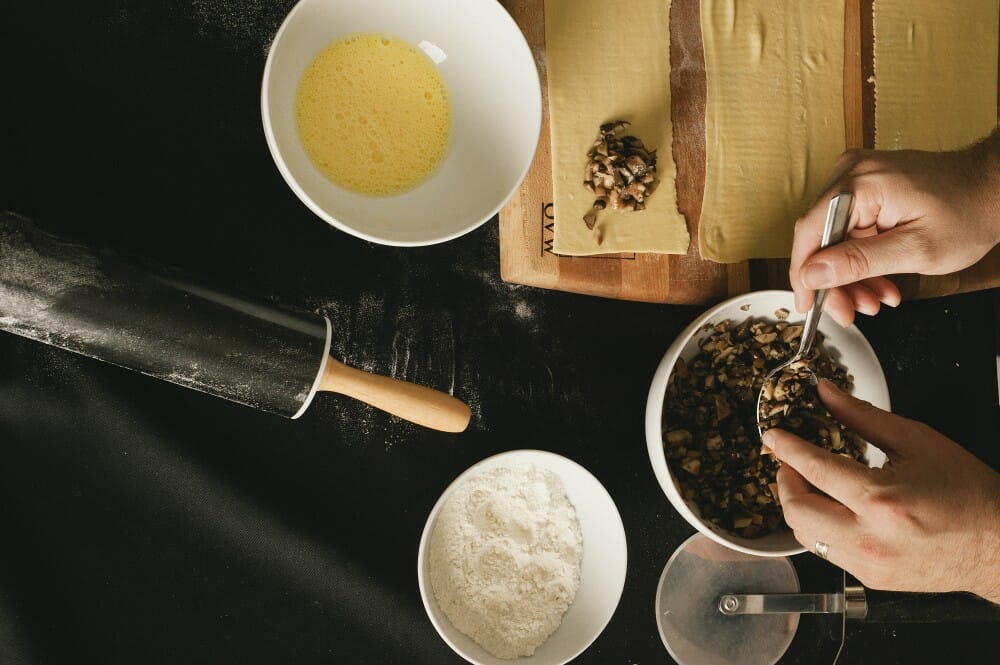
Once the dough has rested, cut in quarters and form into small rectangular shapes. To prevent sticking, coat each piece with a light dusting of flour. With a pasta maker or rolling pin, roll out the dough until it is 1/16 inch thick (the thickness of a coin). You will need two rectangular sheets of pasta of equal size to make one set of ravioli. Place about 1 Tbsp. of filling about 3 inches apart, along one sheet of pasta. Cover the filling with the second sheet of pasta, and use the side of your hand to firmly press in between each mound of filling to form the raviolis. Also, firmly press around all the edges to seal the pasta. Make sure all the seams are sealed off. Cut the ravioli into your desired shape, using a pizza, pastry, or cookie cutter, and then allow to dry on a floured cookie sheet for about 30 minutes.
During the interim, prepare the sauce.
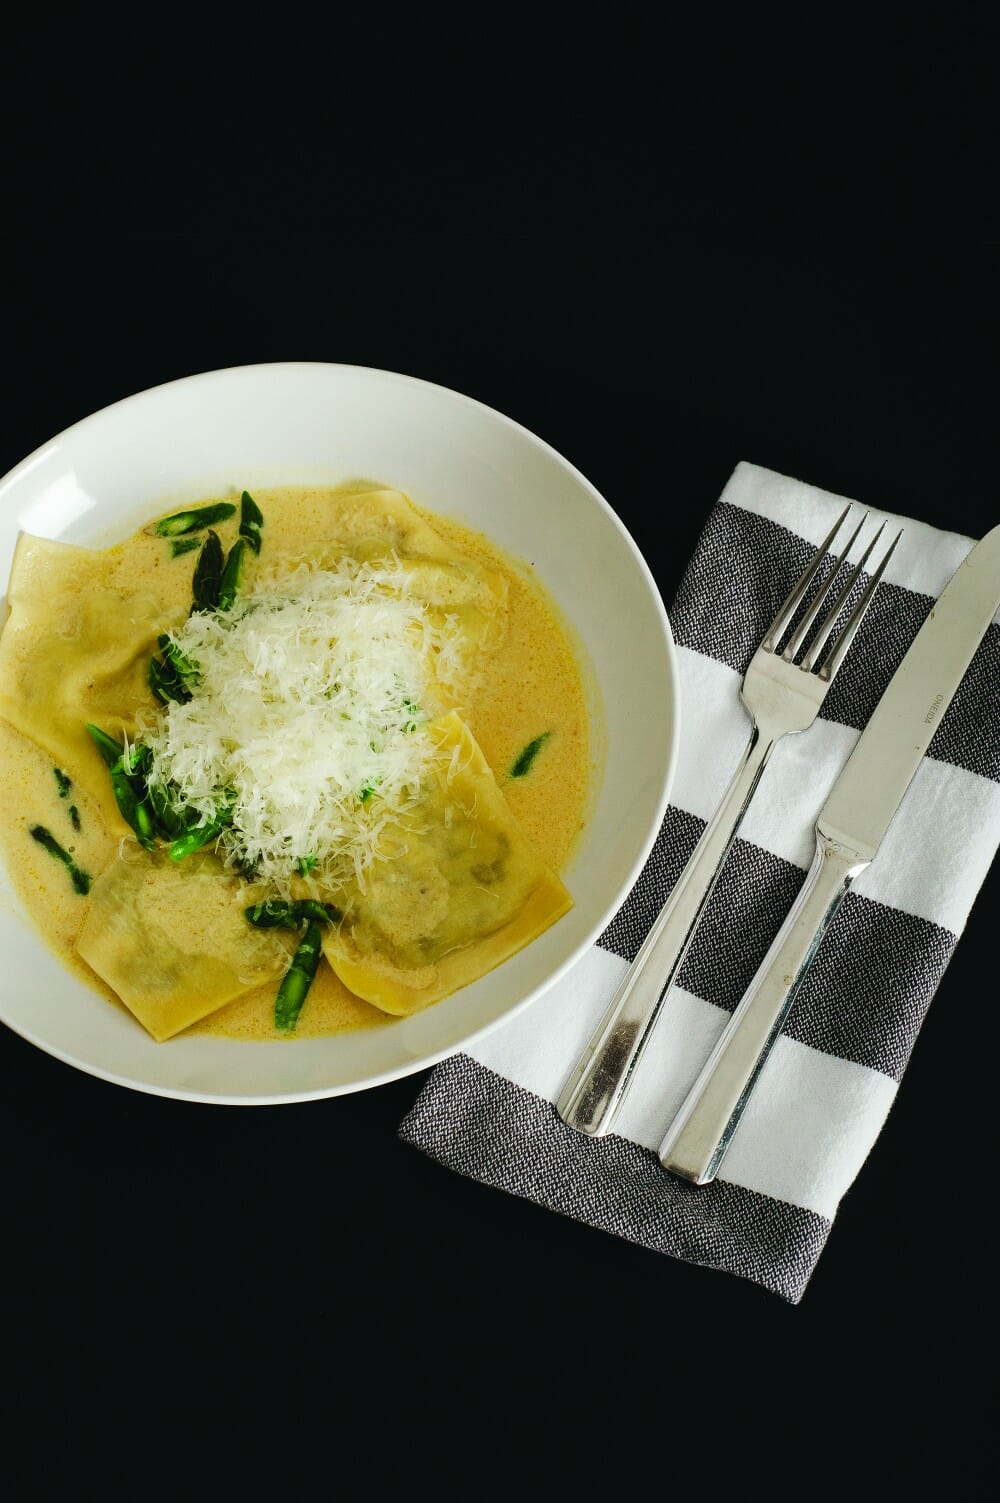
 ASPARAGUS VELOUTÉ
2 Tbsp. butter
2 shallots (minced)
3 cloves garlic (smashed)
1 sprig each rosemary and sage (whole)
2 bay leaves (whole)
1 quart vegetable stock
Juice from half a lemon
1 bunch of asparagus (trimmed and cut into 1-1/2-inch
pieces)
1 cup heavy cream
6 oz. parmesan cheese (whole, for grating)
 Melt butter in a medium sauce pan over medium heat. Add shallots, garlic, rosemary, sage, and bay leaves. Sauté until the shallots are softened and translucent. Add the vegetable stock. Reduce heat to a low simmer and cook for 20 minutes. Just before you’re ready to serve, add the lemon juice and asparagus, and cook an additional 3 minutes. Remove whole herbs; then whisk in cream. Keep on as low a heat as possible until ready to plate. You should end up with a thin yet creamy sauce.
Grate 6 ounces of parmesan cheese for the final garnish.
In a large pot, drop raviolis into salted, boiling water, no more than eight at a time, for 4-5 minutes or until al dente (tender to the tooth). Remove and drain completely before placing into a shallow serving bowl. Spoon about a half cup of sauce per serving (four ravioli are enough for one person) over the pasta, and add a generous mound of parmesan on top.
TIPS
 If you don’t use all of your pasta right away, keep it from drying out by packaging it in plastic wrap and refrigerating it.
We tested this particular pasta dough to see how it would fare when made into hand-cut noodles for our ramen broth, and it turned out quite nicely.
Remember, you may need to adjust your cooking time for the pasta, based on the thickness of the noodle. Different sizes require different cook times.
Definitely make it a point to have plenty of flour available if things get sticky.
[/item][/accordion]
Without question, hand-made past will always be far better than the boxed, dried, store-bought variety.