Ten tips for throwing an enjoyable and affordable summer party
Story by Laura Helm • Photography by Penny & Finn
The school bell has rung for the summer and the kids are begging to stay outside until that last glimmer of sun fades. With the extra hours of daylight, evenings seem to last forever, and there’s no better way to capitalize on them than with friends. Before you bow out of a hosting opportunity, peruse this list of tips and tricks for throwing an awesome (and affordable) summer party. With just a few items and a little ingenuity, you, too, can actually enjoy having the neighbors over.
1. Settle on a color palette.
Struggling to determine what colors go together? Wander through a fabric store and look for a print that catches your eye. Or, scroll through Pinterest and look at the bouquets. This is one of my favorite ways to find inspiration. The mix of flowers, greenery, and what the bouquet is tied with can give you a great, well-rounded color palette. For our party, a tiny, multicolored dipping-bowl set kick-started our entire palette.

2. Carry the inspiration through all aspects of the party.
From top to bottom, I always strive to tie the entire event together. For instance, while on Instagram, I stumbled upon an image of the pattern from an Aztec-inspired couch. I combined that with the color palette and was off to the races! By giving subtle nods to a Mexican flair in both the decor and the menu, the whole event felt more cohesive, without going overboard.
3. Use what you already have (or borrow from a neighbor).
For a small get-together, don’t hesitate to bring out your dishes. We paired plain white ceramic plates with a set of Fiestaware dishes and used mismatched napkins, all within the color palette, and real silverware. Instead of spending money on paper goods, splurge on statement pieces that bring in the pattern in a bold way. I found the drinking glasses at Anthropologie and the gold serving containers at Target, and I love that they are now part of my kitchen collection.
4. Focus on one main table for decor.
Instead of being overwhelmed by decorating the whole event, I like to focus my attention on one signature table. The rest falls into place from there. Use unexpected containers and
focus on the details for that one table. Then, when you look around the room, you’ll be able to continue the details elsewhere. For example, I focused on the main dining table and then continued the theme through the serving and kids’ tables.
5. Pick a menu that has options.
I love the idea of stations or bars. Offer one or two main items, but then allow the guests to pick their own sides and toppings. Especially with a smaller gathering, guests will appreciate having options. In this case, we offered beef and veggie burgers. Guests could pick from a variety of unusual gourmet sides, and they loved being able to personalize the meal to their own tastes.

6. Keep sides simple.
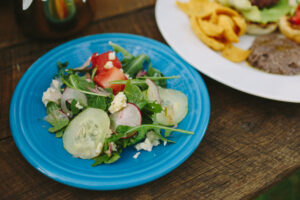
You’ve offered guests variety in the main course, so basic sides aren’t just accepted; they’re appreciated. Guests won’t want to problem solve the whole way down the food table. A great tossed salad, quick kabobs of fruit, an awesome hummus dip with chips — you get the idea. Fresh, simple, tasty.
7. Look for inexpensive items to repurpose.
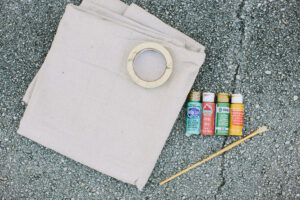
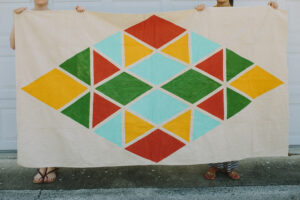
This is often the most confusing or frustrating part for people to create that unexpected design moment. Start with what you want to achieve (i.e., a place to sit, a platter to put “x” on), and then look around for objects that fit the shape you’re going for. Hobby Lobby, Lowe’s, and even garage sales have plenty of options. But, again, know what you’re trying to achieve, focus on the function, and then get creative. I knew I wanted another place for guests to sit, so I used an old drop cloth, painter’s tape, and left-over paint to create our picnic blanket. Check out our DIY tutorial to recreate this project.
8. Play to the kid at heart.
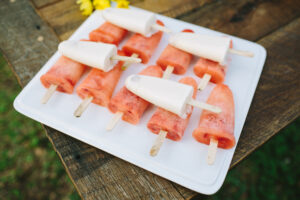
Especially in the summer, adults will appreciate a nod to their youth. For instance, at our party, we knew we wanted to serve popsicles to the kids. Why not gussy up some popsicles that even the adults will appreciate and enjoy? You’ll only need a few extra ingredients, but everyone will love the added touch. We put a spin on a traditional fruit popsicle by using paloma, or Mexican grapefruit.
9. Give the kids something to do.
Designating a “VIP” area just for children will ensure plenty of time for the adults to enjoy themselves. I mimicked the adults’ table runner on the kids’ table and then set out some fun items: $1 pails from Target, along with a few other inexpensive items were all we needed. Personalize their spots quickly and easily by putting their names on the back of the chairs. You can use stickers or even dry-erase markers for a quick cleanup. It doesn’t have to be expensive to show intentionality.
10. Have fun.
I enjoy hosting the most when I can set things up and then just let the day happen. Every event will have its hiccups, and sometimes you need to problem solve. But more often than not, a good sense of humor will make the mishap that much better in the long run. When you enjoy the event, your guests will, too.
[accordion]
[item title=”DIY TUTORIAL”]
 While I was perusing Pinterest for inspiration for our party, I ran across a DIY tutorial from Design Love Fest (designlovefest.com). I adapted it slightly and was incredibly pleased with the result. It’s a very simple project that anyone, even kids, can enjoy.
What you’ll need:
– a drop cloth (I cut a 5’x14’ drop cloth in half. Like I mentioned, use what you have!)
– painter’s or Scotch tape
– Post-it notes
– pen
– paint, in your choice of colors. (Outdoor paint from Michael’s is cheap and easy. I used 1.5 bottles of each color.)
– paint brushes (I purchased an inexpensive brush for each shade so I wouldn’t have to wash them repeatedly.)
How to:
Start by taping out your pattern. Geometric shapes are the easiest to create, but don’t let that limit your creativity. Be sure to seal the tape firmly onto the cloth, as the coarse weave can sometimes not grab it tightly.
After mapping out the pattern, I created a “paint-by- Post-it” system to keep the process foolproof. I wrote the name of the color I wanted in each triangle, so I could paint by color, not shape.
Paint to your heart’s content. If you have a helper, give him or her a brush and a paint tube. I worked on this with four people, and it took us about twenty-five minutes. Since you’re using a drop cloth, you don’t have to worry about the paint seeping through.
Peel up the tape before the paint dries. Allow the drop cloth to dry for at least two hours.
Enjoy your new picnic blanket!

[/item]
[/accordion]
[separator type=”thick”]
RECIPES
[accordion]
[item title=”Watermelon salad with honey lime dressing”]
Serves 8
small seedless watermelon cut into 1-inch cubes (set aside
half the melon for fruit kabobs)
1 bag prewashed baby arugula
1 small red onion halved, thinly sliced lengthwise
1 cucumber peeled, thinly sliced into rounds
3 radishes, thinly sliced
1/4 block Queso fresco cheese
 On a large serving platter, make a bed with the arugula. Intermingle the melon, onion, cucumber and radish randomly over the arugula. Sprinkle with the cheese.
For the dressing:
juice of 1 lime, plus zest
3 tablespoons orange blossom honey
1/2 teaspoon cumin
1/2 teaspoon ground coriander
1/4 teaspoon cayenne pepper
salt and pepper to taste
1/3 cup extra light olive oil
Combine juice, zest, cumin, coriander, and cayenne in a large bowl, and whisk until well mixed. Drizzle oil slowly while whisking until dressing is emulsified. Set aside until ready to
serve.
[/item]
[item title=”Grass-fed beef burgers”]
Makes 8 quarter-pound burgers and 6 sliders, or 12 quarter-pound burgers
3 pounds 80/20 grass-fed ground beef
salt and pepper to taste
olive oil
8 French rolls or hamburger buns
6 dinner rolls
 Heat grill to 500 degrees.
Keep meat in the refrigerator until you’re ready to form patties into your desired size. Use your thumb to make an indentation in each burger to prevent patties from shrinking into too round of a shape when grilling. Place the burgers on a sheet tray and cover with plastic wrap. Let sit in freezer for 5-10 minutes to firm up.
Remove meat from freezer and season on one side with a generous sprinkling of salt and pepper but not enough to overwhelm the flavor of the beef.
Drizzle a small amount of olive oil over the top the prevent sticking.
If the grill is heated to the proper temperature, place the patties directly on the hottest area of the grate with the seasoned side down, giving yourself enough room to flip. Then salt and pepper the unseasoned side of the burger and close the lid. Let sit about 3 minutes to achieve a medium doneness (that is, assuming the grill reaches 500 degrees), raise grill lid and flip patties, then close lid immediately and cook for 3 more minutes. Remove from grill and let rest for at least 5 minutes. In the meantime, split rolls or hamburger buns and
place face down onto hot grill for about 15-20 seconds to get a touch of char and crisper texture on the bread. Remove and serve with condiments.
*Side note: If you don’t have a grill, you can use your stovetop and a skillet. Heat the skillet on high and wait until you see whiffs of smoke coming off the pan, then proceed with the same directions as above.
[/item]
[item title=”Strawberry paloma & Horchata popsicles”]
Makes 6-8 pops per serving
 STRAWBERRY PALOMA
1 cup diced strawberries
2 teaspoons cane sugar
12-ounce can grapefruit soda
1 1/2 cups ruby red grapefruit soda
Place strawberries in a shallow bowl and sprinkle sugar on top. Let stand until the juice from the berries begins to release. Spoon evenly into Popsicle molds. Gently mix the liquids together and pour into mold. Place in freezer for at least 4 hours.
HORCHATA
2 cups plain rice milk
14-ounce can condensed milk
1 vanilla bean pod or 2 teaspoons vanilla extract
1/2 teaspoon ground cinnamon
1/2 cup golden raisins
 Pour both milks in a medium-sized saucepan on low temperature. Stir until condensed milk is incorporated. Split the vanilla bean and scrape the meat into the milk. Throw the bean pod in as well. Add remaining ingredients and steep for 30 minutes. When you’re ready to make the Popsicles, use a slotted spoon to remove the vanilla bean. Then, remove the raisins and disperse them evenly in the Popsicle molds. Pour the horchata liquid into the molds and freeze at least 6 hours.
[/item]
[/accordion]
