Written by Benjamin Vickers
Photography by Brandon Cruz
Food Styling by Keila Rivera
Prop Styling by Lisa Malott
Five recipes to try the day after Thanksgiving.
When I cook at home for my family, it can feel like something out of a 50s television set. An elaborate meal and dessert are planned. The apron is on, the Louis Armstrong record is on, and I’m channeling Lucille Ball in the kitchen but with less slapstick.
If you’re like me, the Thanksgiving meal planning stops with the second gin gimlet, and it’s family time until the next morning… and realize you’ve got fifteen pounds of leftover turkey in the fridge and the only dish you can think of is sandwiches. Let’s put that Louis record back on and think of some creative ways to use up those Thanksgiving leftovers.
[accordion]
[item title=”Turkey Stock”]
 Turkey Stock
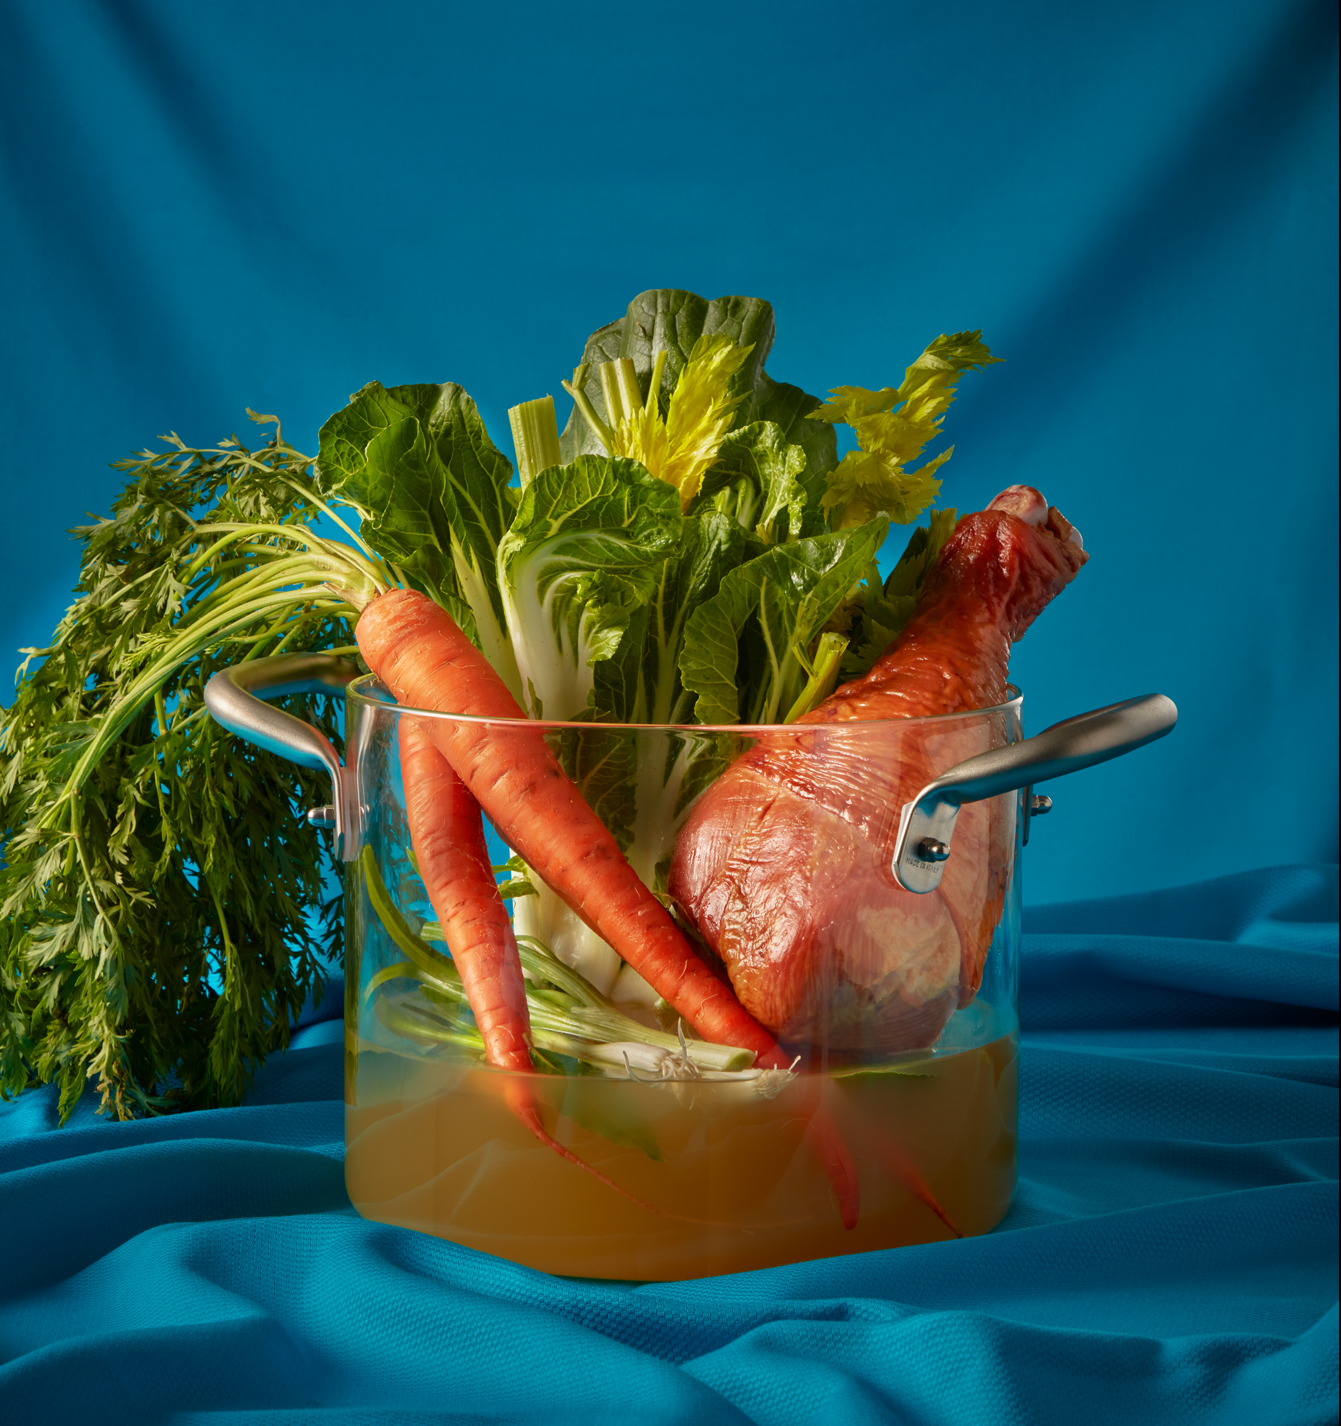 Turkey Stock
Use your leftover turkey bits to make Turkey Stock. Assuming the legs and wings have been eaten, and any breast meat has been used in sandwiches and salads, you’re still left with a juicy, savory set of bones that can impart incredible flavor to a myriad of dishes for the savvy home chef. Making stock isn’t so much a “recipe” as a “technique” that slowly extracts flavor from bones and vegetables into water. It might seem daunting at first, but read on and try it for yourself.
Ingredients:
Turkey carcass: Include all the leftover bones and any skin or flesh – minus that thigh bone your uncle spent half an hour gnawing on.
White or Yellow Onion: peeled and quartered
Celery: Include the rib and leafy bits chopped into large chunks. They’re good for you.
Carrots: Chop it into the same large chunks as celery, and sure, include the leafy top as well because why not?
Herbs: Use whatever you have on hand. Parsley works best, but oregano, rosemary, thyme, sage, or bay leaf could be interesting if you have some on hand and are feeling sassy. Try to use just the leaf parts of herbs as the stems can be bitter.
Freshly cracked black pepper: A few twists of the peppermill will do. We do not use salt when making stock, as the long time spent simmering will concentrate the salty aspect, potentially making it unpleasantly briny-tasting. Save the salt for when you turn the stock into soup.
Water: Use filtered or distilled water if possible. Once everything is in your big stockpot, you’ll need enough water so that everything is mostly covered but not fully submerged.
Method:
Combine everything into your stockpot and bring to a simmer. Continue to simmer for about 4-6 hours… And that’s it! That being said, there are several things you can do to improve the flavor and quality of your stock. Consider trying out these additional techniques:
Don’t let your stock boil. Keep your stock at a simmer, just below boiling, but not quite reaching that point. The heat and roiling action of a boil will make your stock cloudy and will overcook the vegetables.
Skim the top. Periodically, grey foam and fat globules will form on the surface of the liquid. Skimming the foam will keep your stock tasting clean and clear. A fine mesh strainer can do the job well, and running a paper towel across the surface is a great way to soak up any fat blobs.
Taste as you go. Don’t just set a four-hour timer and assume it’s perfect. Use the timer as just a reminder to check the flavor of your stock and judge whether you want it more robust. An excellent way to do this is to sprinkle a tiny bit of salt into a spoonful of liquid so that you can perceive the true vibrancy of your stock. (with no salt, the flavor will always be somewhat transparent) If you sense that your veggies are fully cooked, but you’d like a more robust flavor, go ahead and thoroughly strain your liquid and return it to a clean pot to reduce at a simmer for another hour.
Strain your stock. After your stock is finished on the stovetop, spoon out the larger solids into the compost bin. All of the flavor in the bones and vegetables have been extracted into the stock, so I don’t recommend re-using the veggies in another recipe. Use the finest mesh available to strain the rest; some folks even use large coffee filters to get their stocks crystal-clear.
Using your stock. Your stock can be used in more than just soup. Try cooking rice or pasta in stock instead of plain water and prepare to be amazed.
[/item]
[item title=”Garlic-Braised Potatoes”]

Garlic-Braised Potatoes
Turn leftover potatoes into Garlic-Braised Potatoes. This is a simple no-fuss way to prepare potatoes and use up any stock and herbs that you have lying around. The type of potatoes don’t matter, but my favorites are small red fingerlings.
Ingredients:
Potatoes cut into 1-inch cubes, scrubbed, and drained.
A handful of minced garlic cloves
A few glugs of olive oil, just enough to evenly coat the potatoes
Salt and pepper to taste
Turkey stock, approx. one cup of stock for each pound of potatoes
Fresh herbs such as rosemary and thyme
Method:
In a bowl, toss the potatoes, garlic, and oil together so that everything is evenly distributed and coated in oil. Transfer to a large saute pan and cook over medium-high heat until golden.
Add stock and herbs to the pan and bring to a boil, then reduce heat to a low simmer, occasionally stirring until the stock has reduced into a saucy liquid; about another 30 minutes.
Season with salt and pepper to taste, garnish with more fresh herbs, and transfer to a serving container to be gobbled up immediately.
[/item]
[item title=”Pumpkin Mac & Cheese”] Pumpkin Mac & Cheese
Turn your leftover pumpkin puree into Pumpkin Mac & Cheese. I don’t think this one needs too much introduction. If you have leftover pumpkin or pecans from pie-making this Thanksgiving, both items can find a home in this recipe. Extra points if you use turkey stock for cooking the cavatappi pasta. This is a true June Cleaver-level recipe.
Ingredients:
1½ cup Milk
1 cup Pumpkin Puree
12oz Cooked Pasta (I like cavatappi or other curly noodles)
A half stick of Butter
3½ tbsp All-Purpose Flour
A few sprigs of sage
6oz Shredded Cheese such as Cheddar and Gouda
Chopped Pecans for garnish
Salt and Pepper to Taste
Method:
Melt butter over medium heat in a medium saucepan. Sprinkle in the flour and whisk until thickened, about 2 minutes.
Whisk in the pumpkin, milk, and sage and continue to cook, periodically stirring for a few more minutes until the mixture is thick enough to coat the back of a spoon—season with salt and pepper to taste.
On the lowest heat, stir in shredded cheese in small handfuls until the previous addition is melted before adding more cheese.
Gently stir pasta into the sauce and taste again, adjusting seasoning as needed. Transfer to a casserole serving platter and top with chopped pecans. The dish can be covered and chilled at this point and warmed in a hot oven before serving.
[/item]
[item title=”Honey Button Shortbread Cookie Sandwiches”]
 Honey Button Shortbread Cookie Sandwiches
 Honey Button Shortbread Cookie Sandwiches
Use leftover cranberry sauce to make Honey Button Shortbread Cookie Sandwiches.
Cranberry sauce is one of those things that gets placed on the Thanksgiving table in a giant bowl, and you’re left with STILL a giant bowl after dinner. This recipe turns one of my favorite shortbreads into a cookie sandwich using cranberry jam. The chunky stuff works best.
Ingredients:
Two sticks Soft Butter
⅗ cup Sugar
¼ cup Honey
1 Egg
1 tsp Vanilla
Pinch of Salt
13.5 oz All-Purpose Flour
The zest of one orange
¼ tsp Baking Soda
Method:
Using a mixer with the paddle attachment, cream the butter, sugar, and honey on medium speed until light and fluffy. Add the eggs and Vanilla and stir at low speed for a few seconds, scraping down the sides of the bowl as needed to keep everything in the center.
Add the remaining ingredients and stir at low speed until just coming together into a dough.
Scoop the dough onto a parchment-lined baking sheet and press gently into disks with your fingers or a fork. Garnish with a bit of granulated or raw sugar if you’re feeling sassy.
Bake for about 12-15 minutes at 375*F until barely golden. Let cool thoroughly, then stick two cookies together into a sandwich with a spoonful of cranberry jam.
[/item]
[item title=”Baked Banana Spoonbread”]
 Baked Banana Spoonbread
 Baked Banana Spoonbread
Use your leftover bread to make Baked Banana Spoonbread. This recipe works great with any bread but works best with cornbread, brioche, challah, or other soft loaves. When I’m feeling fancy, I’ll sprinkle sugar on top of the bananas and use a torch to brûlée them as a garnish.
Ingredients:
½ qt milk
½ qt heavy cream
4 whole eggs
4 yolks
¾ cups sugar
2 tsp vanilla extract
2 tsp cinnamon
8oz bread cut into large cubes
Bananas, cut into slices
Method:
Heat your oven to 275*F
Combine All ingredients except the bread and bananas with a whisk or immersion blender. Line the bottom of an aluminum casserole pan with the bread cubes and pour the liquid on top. Then, layer the sliced bananas on top. Let soak overnight, or at least 2 hours.
Bake in the center of your oven for about 15 minutes, then raise the temperature to 325*F and bake for about 10-15 more minutes or until the center of the custard has set.
This recipe can be made ahead, but let the spoonbread cool for at least 30 minutes before covering and transferring to the fridge.
[/item]
[/accordion]
For more fun and creative recipes, including a step-by-step walkthrough on roasting your turkey, visit TheLakelander.com. I hope you have a safe and yummy Thanksgiving with your loved ones… Now play me out with the “I Love Lucy” theme.